Showing posts with label Rotary Cutters. Show all posts

Friday, April 4, 2025

Jelly Roll Rug completed

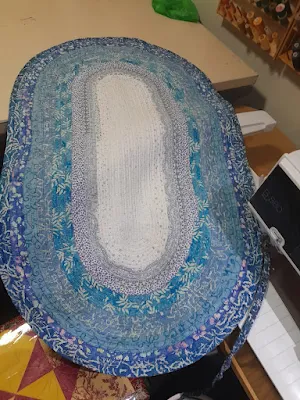
Although I had to undo the blue part twice, it was such a fulfilling project that I ordered more batting from Temu to stitch another one.  The undo part was rough will millions of little pieces of thread to remove, but the stitching itself is utterly relaxing, just you, your thoughts and your machine chucking away.  And the best part, it is finished when the rope ends!  No quilting, nothing.  It is done.

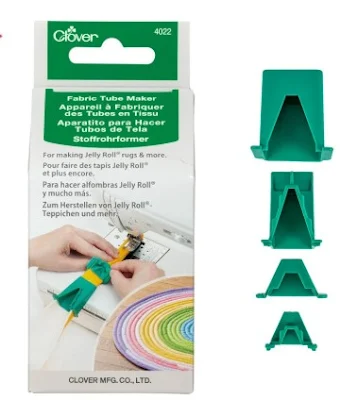
So, using the nifty Clover Tube Maker, the strips with batting are turned into a long tube 4 layers thick


and rolled into a ball by starting with the colors you want on the outside of the rug on the inside of the ball.


There are a few ways of starting out in the center for an oval mat and I chose the more traditional way which use this template.  To calculate the beginning of the start strip, just deduct the width from the length of the rug.  I think I started with about a 12" strip and ended up with a rug of  34 x 44".


I did not experience any trouble with the inside bends, just keep scrunching around the bends, keeping the outside of the tubing flat and iron regularly.


With the blue parts though, I somehow didn't feel the need to keep on feeding extra fabric around the bends, big mistake.  But, after fixing it, it came out great.  The photo was taken just before the final press. so I can guarantee you it lays flat.


At end of the rug, I just added a handmade label to both sides and added the quilt's label to the back and off to Bloemshow it went.


Three of the Rotary Cutter members finished their items as well.

Rika stitched a beautiful turquoise rug,

Marietjie did a rug in shades of blue

and Hesmari made a gorgeous beach bag.

This group offers so much help.  Do join them and just follow the posts for a few weeks before starting your own.  Uniquely Mateo is another goldmine of information.  Another big help is this Jelly Roll Calculator which tells you how many strips you need for a specific size.  So, what are you waiting for? Take the plunge and enjoy!


Sunday, February 2, 2025

Fabric Origami Basket

At our last meeting of 2024, our quilting group, the Rotary Cutters, made some fabric origami baskets.  Starting off with 2 squares and after folding and ironing multiple times, we ended up with a cute little basket.

Mine

Magda's

Hesmari's

Angeline's

and Louise-Marie's

If you want to make one yourself, just follow the instructions here.

Friday, January 24, 2025

Jelly Roll Rug

Our quilting group, the Rotary Cutters, decided on Jelly Roll Rugs as our first project for the new year.  I had two similar Jelly Rolls of 25 strips each and combined them into one long strip.
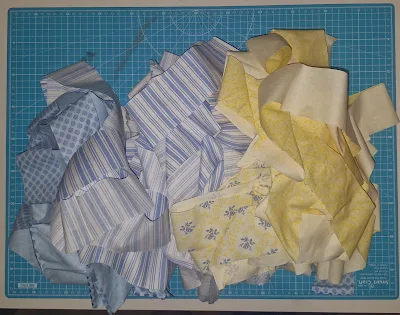
50m fabric strips

After this step, the fabric gets rolled onto a pvc pipe awaiting the next step.  Luckily my husband had a pipe laying around and asked our neighbor to saw 2.5" lengths which I could give out to all our group members at our meeting on Wednesday.

We are now awaiting our rolls of precut batting which are ordered from Temu to continue stitching the fabric and batting into a long tube.


In order to create the tubing, we also bought the Clover Fabric Tube Maker which just make the process so much easier than folding by hand.  

Now, you don't have to buy all these nice to have's.  You can buy your own fabric and batting and cut them to 2.5" and 2.25" respectively over the width of fabric.  If you want to get a Clover Tubing tool, they are available here on Clover and Stitch's page.

I joined a Jelly Roll Rug group on Facebook and found very handy tips as does Uniquely Mateo.

With the tubing you can create placemats, bags etc. in any shape or form with circular and oval shapes by far the favorite followed by rectangle mats.  One thing to remember though is that they will slide on tile or wooden floors without something attached to the back to keep them in place, but placing on carpeted floors, no problem with sliding and it can then be used on both sides.

Below is a beautiful bag created with the tubing.


So watch this space as we proceed with our individual projects.


Thursday, December 26, 2024

Decorating envelope and card with serviettes

One of our Rotary Cutter's quilting members is a very talented and accomplished artist in various mediums as well as sniffing out all kinds of interesting and/or fast projects on the various social media pages. 

Before all of us went our different directions over the holidays, she kindly showed us how to decorate an ordinary envelope into something truly special and make an accompanying card using an envelope, a serviette and cling wrap ironed between baking paper sheets with a hot dry iron.


She also demonstrated how to fold your own envelope from any size of paper.


I am really interested to know how the serviette technique will work on fabric and is definitely going to give it a try once back home.


Saturday, September 7, 2024

Disappearing Pinwheel

The second project our Rotary Cutters quilt group did for the year, was the Disappearing Pinwheel.  Another very innovative way of starting off with just two squares of light and dark, constructing half square triangles and stitching them together to form a 12" pinwheel.


After cutting this block then in 3 equal strips horizontal and vertical, you are left with a very small pinwheel, 4 smaller hst's and 4 squares.  And then the fun start.  By mixing these blocks up and laying them out in different ways, all sorts of looks can be created like shown below which is the layout Frances's picked

or this one, the look I went for.

It is created with 4 blocks laid out in the order as shown below which really had me utterly confused as I swopped the dark and light fabrics.  And I also wanted the print of the darker fabric to all go in the same direction in each quarter, which my son (not so jokingly) refers to as his mother's OCD.


By adding a second row, the stunning layout below are created which was what I was originally going after, but at this stage I stitched only 2 centers which will each cover our bedside tables.  Otherwise, it might just end up as another unused quilt.


By adding a third row, this beauty is created.


With me still struggling to finish January's Four Patch Posy, two small runners are definitely the way to go.


Friday, February 23, 2024

Four patch posy

Last year when our quilting group discussed projects for 2024, the Four Patch Posy was one of the possibilities mentioned. So off to the shops to find 4 repeats of a floral fabric with large motifs and a dark background.  One would have thought it is a rather simple task, but I rather struggled to find a piece that met all the requirements.  I finally settled on red hibiscus flowers printed on a black background.

Under the guidance of one of our members, Elsa, we all got cutting our fabrics.  With Elsa's help I was able to use the whole one meter piece I bought with minimum waste. As the flowers are so big and prominent, I cut 6" blocks whereas the other ladies cut 4" blocks.  The pattern is a simplified kaleidoscope with four identical blocks making up one posy.

I wasn't really happy with my choice of fabric when I initially started laying out the blocks as it didn't have the prominent kaleidoscope effect, but I do think the 9 blocks turned out quite beautiful in the end.


Friday, July 14, 2023

Biscornu and Scissor cases

After embroidering a biscornu and scissor pockets for my friend's birthday, the other members of our quilting group, the Rotary Cutters, expressed their interest in obtaining similar sets.  I told them it's fine, I will do the embroidery as long as they do the hand stitching themselves as I am not big on doing hand stitching.  Luckily only one ordered the complete set with the biscornu included, so I decided to finish sewing everything.  Each ordered in their favorite colors, so after combining the various parts and pieces in the largest frame my Brother Innovis 4000 uses, I started embroidering.  And I must say, they did look gorgeous.

Marietjie loves red and green which was embroidered on a light ivory Chintz fabric.

Angeline chose grey, turquoise and magenta and I stitched this on white Chintz.

After friend Aletta saw Angeline's set, she also ordered one.
(Updated 1 October 2023)

Elsa requested black and red which was also stitched on white.

and Frances chose the rich bible colors of purple, fuchsia, scarlet etc. also stitched on white.

The designs are the Biscornu 2 set from Artistic designs available here. 

Friend Magda got a set for her birthday done in orange and green on the ivory Chintz.

Whilst embroidering al the sets, I kept everyone's bits and pieces in separate marked bags with the colors used as not to get confused.

All that remains now is to put all the thread used away in the handy steel drawer system I use to keep my threads organized by color and number.


Over the 23 years since starting to embroider, I managed to collect the whole catalogue of Marathon Thread of 399 cones as well as a few other brands.


Each one is wrapped with a plastic sleeve which are kept in place with a small elastic band to protect it from dust.


Edge to Edge Quilting Designs Set 2

Set two of the designs I wrote about in  this  post is available in  my shop.